 Make this Christmas card to bring Seasons Greetings from your house to a neighbor's house, and spread some Christmas cheer.
Total Time: 20 minutes
Yield: 1 card
Supplies:
- 1 pattern of house
- tracing paper and pencil
- 1 in 11.7 x 8.3 (A4) sheet of pink patterned cardstock
- 1 in 5 x 5 black cardstock
- 1 in 5 x 3 white corrugated cardstock
- 1 leftover piece of green cardstock
- 4 paper flowers
- 6 pearl heart pony beads
- 8 small blue flat-sided rhinestone beads
- 4 small red flat-sided rhinestone beads
- silver thread
- Foilart Super-tack glue pen
- pink craft foil
- tree-shaped paper punch
- craft glue
- scissors
- stanley knife (utility knife)
- ruler
- 1 sheet of ordinary white printer paper
see http://www.smokymountaincraftsupplies.com/pony-beads-heartpearl.html for a possible supplier of pony beads
Steps:
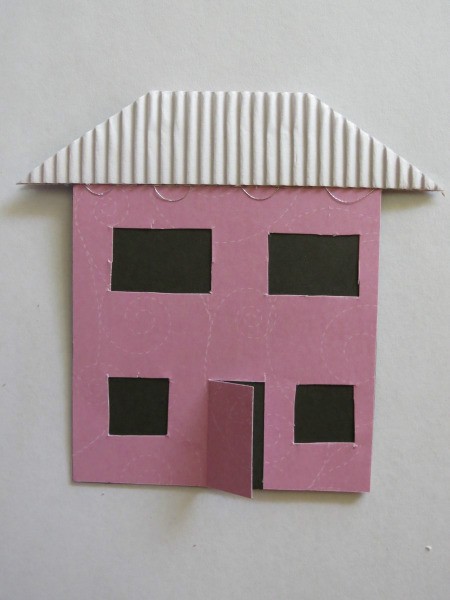
- Trace and cut the house from the pink patterned card stock.

- Score the house length-wise and with the fold at the top, cut off any protruding edges, so that the house will look neat.
- Cut out all the windows, and cut open the door and fold it back, so that the door will stand slightly ajar.

- Glue the black cardboard to the back of the front of the house, and cut off any protruding edges.
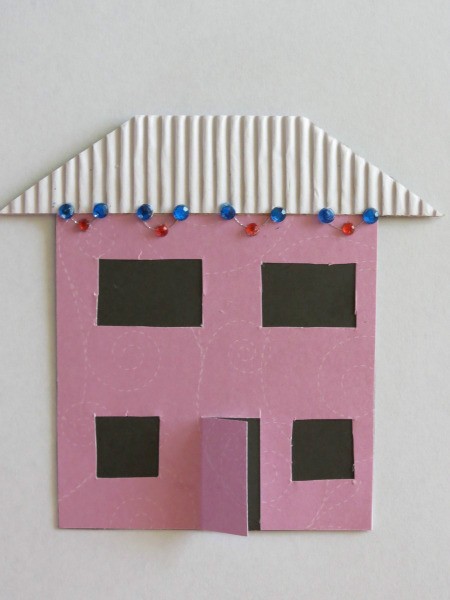
- Glue the silver thread to the top of the roof ~ make a wiggly pattern. This will be the "electrical cord" from which the Christmas lights will hang.
- Use the corrugated cardboard to add a roof to the front of the house, and cut off any protruding edges.
- Glue the rhinestone beads in place to complete the string of Christmas lights.
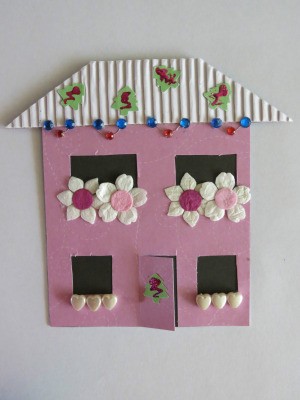
- Glue the paper flowers at the bottom of the top windows.
- Use the tree punch and punch out five Christmas trees.
- Glue one tree to the door, and four to the roof of the house.
- Use Super-tack glue to add some detail to the trees.
- Allow the Super-tack glue to dry for about 10 minutes. When the glue is wet, it is blue, but when it is dry it becomes transparent.
- Press foil down on the glue. Remember that, of course - the pink side of the foil must be on top.
- Rub the foil over the areas where you have added glue with the Super-tack glue pen.
- Carefully lift the foil. On the areas where you have added glue with the Super-tack pen, some of the foil will stay behind, thereby highlighting certain areas of the trees.
- Use the pearl heart pony beads to add window sills to the bottom windows.
- Space and print the following onto the white printer paper:
Seasons Greetings from our house to yours.
- Glue the message to the inside of the card.