Here's a great holiday project using scrap felt pieces and a little bit of nature. The end result is a one of a kind ornament, wonderful as a small gift, or just to add to your own tree. You can also use them as tags on gifts. You can purchase cinnamon scented pinecones once stores put out their holiday inventory, but gathering them from nature is a very inexpensive way to go.
Approximate Time: 1 hr. for each
Supplies:
- collection of pinecones
- felt
- ribbon - hangers and scarf
- 2 pom poms - ear muffs
- pipe cleaner - ear muff band
- beads - facial features, buttons (penguin), and angel embellishment
- dried straw grasses or raffia
- doll hair or yarn
- wire
- scrap of red material or felt
- thin cardboard - cereal box
- paint - I almost always use acrylic paint, particularly Apple Barrel and Folk Art brands.
- blush for cheeks - optional
- clear nail polish - optional
- glitter and glitter glue
- glue - I used E6000, it is a very good craft glue.
- small garden snippers
Instructions:
- Cut scales off pinecones. Collect several since some scales will not be useful or may break when you cut them off. I used small garden snippers to cut mine which worked very well.
Tip: I purchased them at a Dollar Tree and they are one of the best I have used.
- Make a small pile of cut scales to begin with and just cut more as needed.
- Use empty cereal boxes and such for the cardboard. You will cut a body also from cardboard slightly smaller than the pattern piece. This will be inserted between both body pieces to make ornament stiffer and hold it's shape better.
- I wanted my ornaments to shine so I brushed clear nail polish on the scales after the paint and glitter was dry.
Tip: Clear nail polish works great in small projects. It dries quickly and gives a high shine.

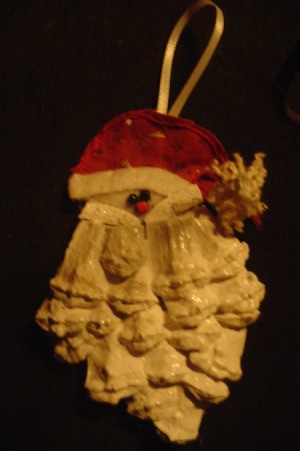
Santa:
- Cut face pieces from white felt.
- Cut one slightly smaller from cardboard.
- Cut hat pieces from red felt or material and hat band from white felt. (This just needs to be a small strip long enough to encircle the base of the hat).
- Sew eyes and nose onto one face piece.
- Place cardboard piece in between and stitch face pieces together.
- Sew hat together, leaving bottom edge open. Insert head into hat (dotted line shows placement) and stitch bottom edge closed.
- Sew or glue hat band on. Sew or glue pom pom on tip of hat.
- Rub blush on cheeks, if desired.
- Sew ribbon loop on back to hang.
- Arrange scales on for beard to get a rough idea of how many you will need. Trim edges neatly and to fit area where needed. Glue each on to form beard.
- Take one scale and snip it in half length wise for mustache. Glue into place.
- When dry, paint beard white. Sprinkle on silver glitter while paint is wet, if desired.
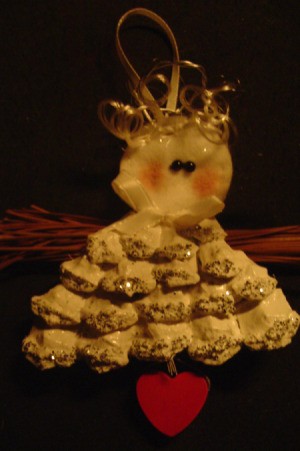
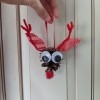
Angel:
- Cut head and body pieces from white felt.
- Take one face piece and sew on beads for eyes.
- Rub blush on cheeks, if desired.
- Take 2 pieces of wire approximately 10 inches long and twist them together. Make a loop about the size of a nickel at one end and twist the end to secure closed. Bend the loop down so it forms a halo.
- Lay this between the 2 head pieces so the halo sits just above the face and stitch head closed. Be sure to make an extra stitch or two around the wire at the top and at the neck to help secure.
- Put cardboard piece in between the body pieces and lay the wire extending from the neck on top of the cardboard. You can lay a piece of tape over the wire to help hold it still while stitching.
- Stitch body pieces together, meeting the top of the body to the bottom of the head so no wire is showing there.
- Slide a bead on to the end of the wire at the bottom of the body and twist ends to secure.
- Cut small pieces of doll hair or yarn and stitch to top of head.
- Cut pieces of straw or raffia for wings and tie in the center of bundle. Lay bundle on back of angel and cut a small square from some felt large enough to put over the bundle. Stitch edges of square to secure wings on back.
- Sew ribbon on back for loop.
- Cut and trim scales to cover body. Start with bottom layer and work your way up.
- Glue into place and paint white. Use glitter glue on edges of scales, if desired.
- Make a small bow from ribbon and glue at neck.

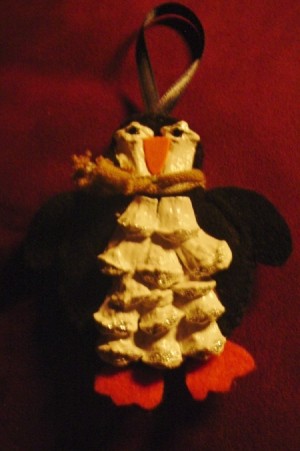
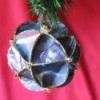
Penguin
- Cut body from cardboard. Cut body pieces from black felt. The wings and feet are also cut from felt. Stitch body together, inserting wings and feet in place as you go (dotted lines show placement).
- Stitch ribbon on back for hanger.
- Cut and trim scales for tummy. Glue into place.
- Take 2 scales that are similar in size and glue onto face at a slight angle (see photo). You may have to trim these a little to fit.
- Paint all scales white.
- Make 2 dots with black paint for eyes.
- When dry, take a small strip of material and tie around neck for scarf.
- Cut a small beak from felt or foam and glue on to face.
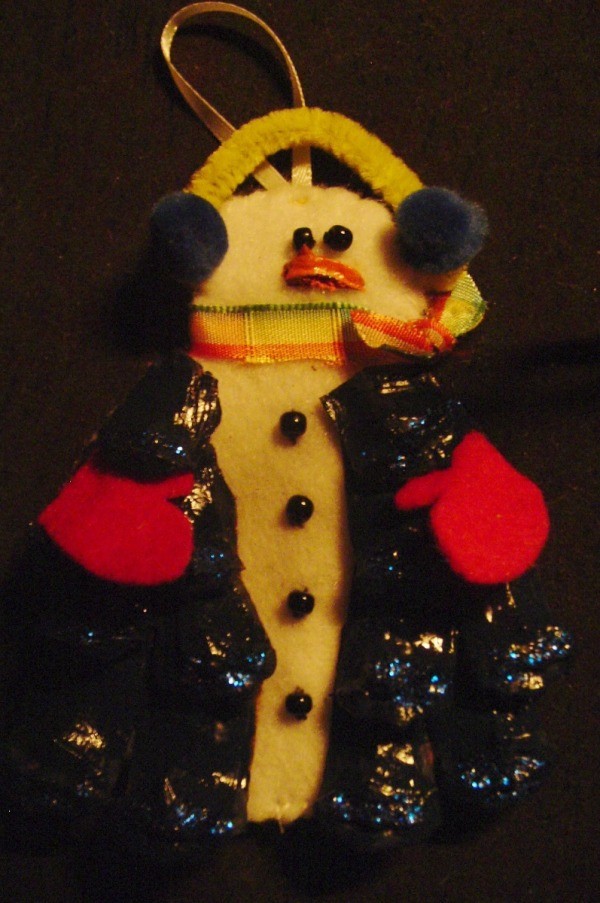
Snowman
- Cut cardboard and body pieces.
- Take one body piece and sew on beads for eyes and buttons.
- Insert cardboard and sew body pieces together.
- Sew ribbon on back for hanger.
- Bend a piece of pipe cleaner for ear muff band. Bend back end slightly and sew onto sides of head.
- Glue on pom poms.
- Use a small strip of material or ribbon and tie on for scarf.
- Cut and shape scales for coat. Arrange at a slight angle on each side so the center of the snowman shows (see photo).
- Choose color and paint scales. I made mine in midnight blue and trimmed each edge with blue glitter glue.
- Cut a piece of scale in shape for carrot and glue to face. Paint orange.
- Glue a mitten on each side (see photo).
By Mary from Palm Coast, FL