Seasonal magnets made from paper and reminiscent of that favorite Christmas houseplant!
Materials and Equipment:
a large plastic bag or several sheets of newspaper
Advertisement
a sheet of red construction or cardstock paper, standard size
a sheet of green construction or cardstock paper, standard size
a sheet of plain paper, standard size
three small yellow beads
one small magnet (I use rare earth magnets as they are very strong and hold items onto the fridge tightly)
scissors
craft glue
glue spreader or Q-tip
a lid from a used plastic container (such as a yogurt container)
a pencil
an eraser
Instructions:
Before starting, clear the table and cover it with newspaper or a large garbage bag to avoid getting glue on the table.
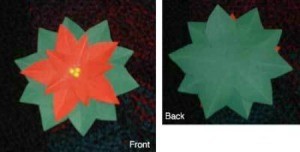
Using the photos as a guide, trace out a five-point 'star' on a plain sheet of paper with a pencil. The star should be about four inches in diameter. Each 'point' on the star should be curved in the shape of a leaf. Once you are happy with your design, cut it out. It will be used as a template to create your poinsettia.
Advertisement
Place your template on the green construction or cardstock paper and trace its outline in pencil. Cut along the outline. Erase any pencils lines that are still visible and set this form aside.
Repeat step three. You should now have two identical green stars.
Repeat step three again with the red construction paper, only this time, once you have cut out the shape, cut around the perimeter again, making the star shape slightly smaller than the previous one. If your green stars are about four inches in diameter, this red one should be three inches in diameter.
Repeat step three again with the red construction paper. Again, once you have cut out the shape, cut around the perimeter, making the star shape slightly smaller than the previous red one, about two inches in diameter.
Advertisement
Take each one of your star forms and bend each point or leaf in half, then open each leaf again. They should now all have a slight bend and no longer look completely flat.
Pour a small puddle of craft glue onto the plastic container lid. Spread a thin layer of glue onto the center of the back of one of the green stars. Place this green star on top of the other green star so that the leaves or points are staggered and not overlapping (see photo). The creased side of the stars should be facing upwards (see photo). Press the star with the glue on the back on top of the other green star. Hold until stuck.
Spread glue on the back of the larger red star and press onto the front of the uppermost green star. The red star should be oriented so that its points fall between those of the green star and don't overlap.
Advertisement
Spread glue on the back of the smaller red star and press it onto the front of the larger red star. The red star should be oriented so that its points fall between those of the other red star and don't overlap.
You should now have four staggered stars (two green and two red) glued on top of each other. Next, glue your three yellow beads onto the center of the uppermost star to act as stamens for your poinsettia.
Spread glue on the back of the magnet and press it onto the back of your poinsettia. Allow to dry completely.
Make a few more magnets and decorate you fridge with these cheerful Christmas flowers.
 Seasonal magnets made from paper and reminiscent of that favorite Christmas houseplant!