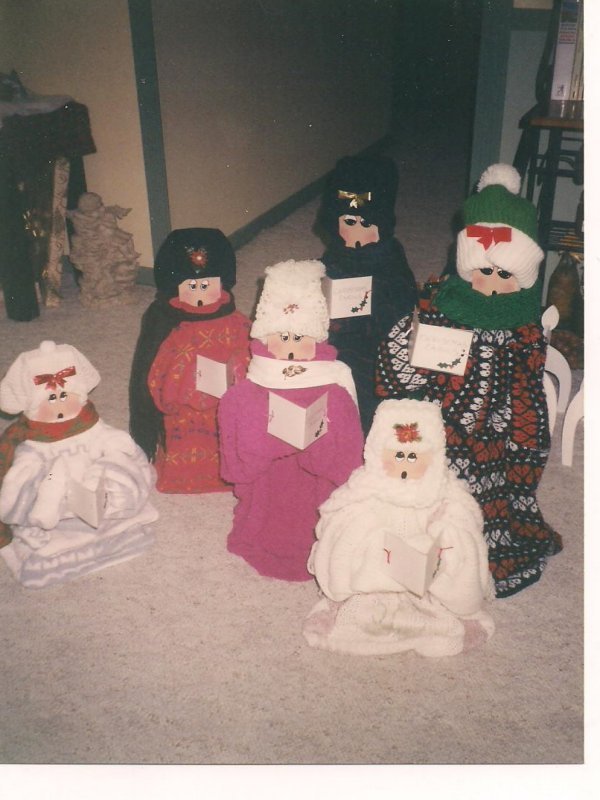
These cute little singers are a great Christmas project. Since I already had wood left over from other projects, they were also a recycled project. Family and friends gave me outgrown clothing and I also purchased a lot from a thrift store that runs a "Fill a bag for $1.00" sale each week. You can find salvage bins at many home stores for wood, but even at full price, 2x4s are inexpensive.
Advertisement
Be sure to read through the directions first. I have made many of these carolers over the years and have found shortcuts and improvements so I will share these tips with you.
Approximate Time: approximately 1-3 hrs.
Supplies:
varied lengths of 2x4s
wire clothes hanger or heavy gauge wire
sweaters, hats, and scarves
cardstock or cardboard
scrap pine or similar wood
stapler
saw
drill
paint
accessories of your choice
Instructions:
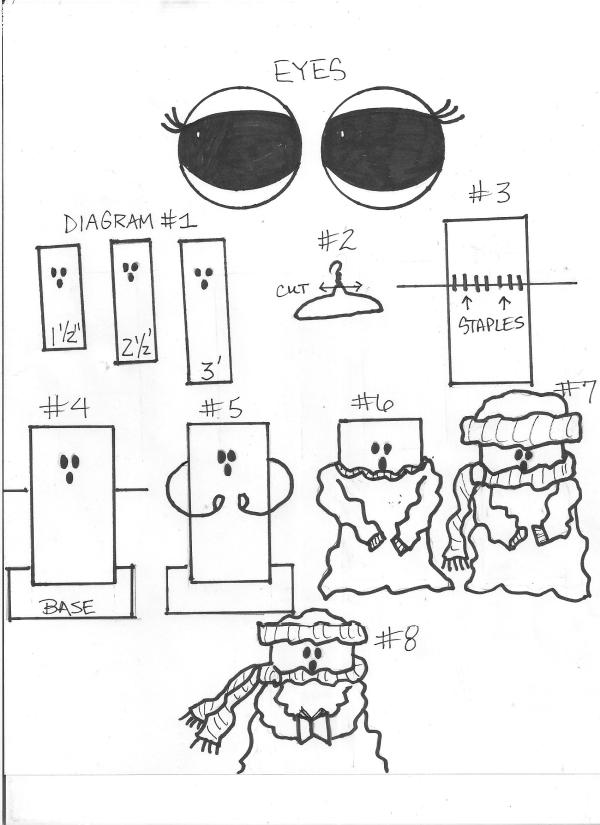
Cut your 2x4s to desired lengths, if needed. I made 3 carolers per set: 1 1/2 feet, 2 1/2 feet, and one approximately 3 feet tall. See diagram #1.
Advertisement
Judge where facial features will go by placing hat on. The eyes on my diagram sheet are larger than actual size. Later on, you will secure hat with staples, but this will give you an idea of where to paint eyes and mouth.
Paint on the facial features you desire. I used blush and rubbed it on for cheeks. I also gave the eyes some eyelashes. I painted an oval for the mouth to make them look like they are singing. When dried, I gave the face a coat of varnish.
Take wire hanger and snip off neck and hook parts. See diagram #2. Straighten out coat hanger wire so it is one long piece.
Lay 2x4 down and place center of wire at about shoulder height. Staple several times to secure wire to wood. See diagram #3.
Cut wood into a square for the base. It needs to be big enough to enable the caroler to stand. Center 2x4 and attach base with screws. At this point, the caroler should look like diagram #4.
Advertisement
Take each arm wire and bend it forward. Just imagine yourself holding a songbook in front of your body. You want to bend the wire to resemble this image.
If the wire is too long for the size caroler you are making, use wire cutters and snip excess off. With pliers, bend each wire end into a loop. This will be their hands and after they are dressed, you will be looping them together. See diagram #5.
Slip sweater over the head and insert each arm wire through sleeves. The sleeves should be quite a bit longer than the wire arms. See diagram #6.
Gather sweater at neck and staple around it to secure to wood. The scarf will hide any staples that show. Wrap scarf around neck and tie where desired. Place a few staples to secure to wood. On some of mine, I made the scarf come up higher to hide the mouth, just to give them different looks.
Advertisement
Push sweater up on each arm and insert one loop hand into the other. Use pliers and squeeze loops closed. I gave the cuffs a few stitches to secure and keep them together. Bend arms to shape, if needed. You can add jewelry, pins, bows, and any other decorations you may want. A couple of bells tied on a ribbon bow and placed on a hat is cute. I just hot glued my accessories on. This is a great way to use up that costume jewelry, bows, and extra ribbon.
Place hat on head and play with it until you have it where you want it. Place staples around to secure. See diagram #7.
Flair out the bottom of the sweater so it covers the square wood base. Staple it on all sides to wood to secure. At this point, the only wood showing should be the face.
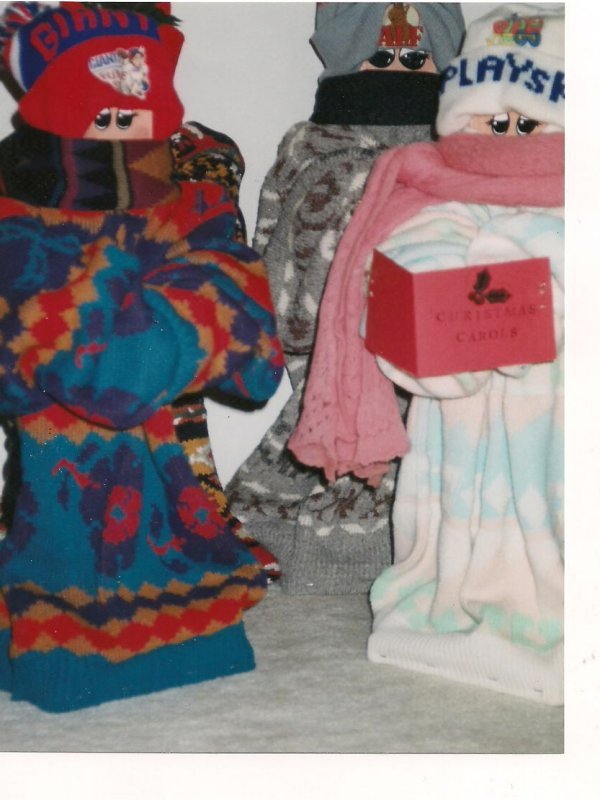
To make a songbook, cut a rectangle from heavy cardstock paper or cardboard. I found some sheet music in a thrift store and placed a piece inside my books. Decorate the front with markers. I had a set of these on my porch so I covered the entire book with clear Contact paper.
Advertisement
Punch a hole on each side of the book and stitch to the sweater where the hands would be. Try to catch the wire in your stitching so it will help the book to stand upright. See diagram #8.
TIPS: V necked or low cut sweaters will not work well. Try to use round necked or high collar ones. The idea is to cover all the wood with only the face showing and the more sweater you have to work with, the better. For example, on my 3 foot caroler, I used a large adult sweater. By the time you gather it all where needed, it will look just fine. On the 2 1/2 foot ones, I used a large older child's sweater or a small adult's.
After making a few sets of them, I found that by sliding a length of foam pipe insulation on to their wire arms, it made the arms look fuller and the sweater seemed to hang better.
Advertisement
Just about any type of winter hat will work, but just like the sweater, you will want them bigger. Don't use one that is so small that it's tight when you slip it on the 2x4. You don't want the actual form of the 2x4 to show. All the clothing should have a kind of "baggy" look. This gives them personality.
When choosing wood for the base, you want to use a type of wood that is wide enough to staple into it. Pine is ideal. If purchasing wood, buy the cheapest grade. I have made several sets for family and friends and I still have a set that I made years ago.
These carolers are really quite easy to make and if you try one, you will find yourself wanting to make more. I do so every year and they also make great gifts! They look adorable standing grouped together near the Christmas tree or on a porch or entryway.
These are simply adorable and you are an "artiste". I'm not sure what I'll end up with , but your instructions are simple enough, so I'm willing to try. The diagrams will help so much too.
Thank you for sharing this nice craft when we have plenty of time to make them for Christmas, Mary. If my first set comes out OK, I'll be making more for gifts. Pookarina
Keeper Gold Feedback Medal for All Time! 690 Feedbacks
July 7, 20110 found this helpful
Mary,these look so cute and seem easy enough to make. Thanks for posting.
Lee Bronze Feedback Medal for All Time! 145 Feedbacks
July 12, 20110 found this helpful
Very nice Christmas craft. I'd like to try making them. Hope mine turn out as cute as yours are. Thanks for a great idea. Lee